

If you’ve worked in marketing automation platforms, chances are you’ve felt it. That heart-sinking, gut-wrenching, headache-inducing feeling of sending out an email in error. Early in my career, my first encounter with a mistaken email was when I accidentally sent an email with a placeholder. Let me tell you, to this day, I never use placeholders.
I eventually bounced back, but man, was that one hard day (which may or may not have included me crying over a Big Mac in the McDonald’s parking lot). I know I won’t be able to save you from every email marketing blunder (because let’s face it, we are human) but I’m hoping these tips will help you be more prepared when working in Pardot’s engagement studio.
1. Consider using a “sent email in the past 24 hours” list as a suppression.
Unlike other Marketing Automation systems, Pardot doesn’t have a system wide communication limit that can be set. So, if you aren’t careful, you could be emailing folks multiple times a day. For example, Person A is in your nurture program and is set to receive an email at 11 am. But maybe you sent out a marketing email earlier at 10 am. Well, Person A is going to get both of those emails. Adding the “sent email in the past 24 hours” list will help prevent this. Just make sure that your nurture emails are setup with send times that are at least 30 minutes apart (see rule 3 for more information).To build your “sent email in the past 24 hours” you will go to Segmentation > Lists > Create a Dynamic List and set the rules as follows:

2. Add a “completed” tag to prospects who complete your program.
It can be difficult to truly tell who has completed the program. My solve for that is to always create a “completed” tag that can be applied to prospects once they finish the program. That extra visibility is especially helpful for when you want your prospects to run through another nurture program after they have completed your first one. If you go to the end of your program, you’ll see an option to add an action step. It’s just above the “end” icon (that red icon with the white square). You’ll select “apply tags”.

3. If working with multiple nurture programs, stagger out the send time range.
Sometimes prospects can be a part of multiple nurtures so to avoid bombarding them with too many emails, make sure to spread out the send times. For example:
- Nurture 1: Sends on Tuesdays between 8 am – 4 pm
- Nurture 2: Sends on Wednesdays between 10 am – 6 pm
- Nurture 3: Sends on Thursdays between 8 am – 4 pm
Pro Tip: It’s worth noting here that any email programs should be shared with your sales and customer success teams. They have a unique perspective and key insights into prospects and customers, so keeping them in the loop gives them an opportunity to provide feedback that can optimize your programs.
4. Keep it simple.
If you find yourself using more than 20 steps in your program, it’s likely too complicated. Too many steps makes it difficult to see where prospects are in the flow. In most cases, the level of effort involved in a more complicated setup, isn’t worth the return. Alternatively, there are many functions you can setup at the asset level that can reduce the number of steps in your program. For example, you can utilize custom redirects on links and add completion actions on the custom redirect. You can also add completion steps at the email level.
5. Be careful with wait steps.
There are two options when adding in your wait steps, “Wait up to…” and a “Wait…” You need to think about how folks could flow through and the different scenarios that might arise. For example, if you have a ‘click’ as a trigger, make sure that your program isn’t setup so that if someone clicks email 1 they immediately get email 2 (unless of course that’s the result you are wanting). A wait step can add in some much-needed cushion time.
6. Test, test and test!
You can easily copy full on engagement studio programs, so there’s no excuse for not utilizing your first build as a test. You want to make sure that everything is operating exactly as expected. Pardot has a feature that allows you to see a visual presentation of what will happen in the engagement studio (see the “Test” tab in your engagement studio), but I prefer to do a live test. Create a recipient list, add yourself and a few co-workers to it, and test the full program. Have your co-workers take different actions to replicate different scenarios that your prospects might experience while in the program.
7. Ignore the step names.
Once you turn your program on, you might notice that Pardot assigns numbers to certain action steps. It can be confusing because sometimes your first email send will say something like “Send Email (2)” (see example below).
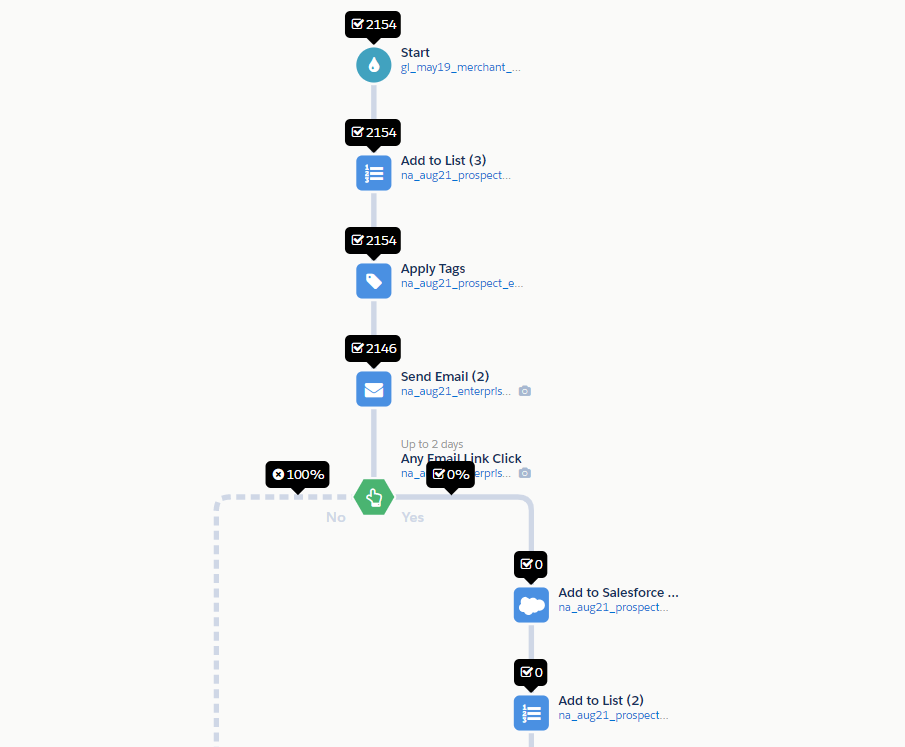
Don’t get hung up on this, Pardot seems to randomly assign these names. They won’t always correlate with the order in which prospects hit certain actions. For the most part these can be ignored.
Keep in mind if you export any reporting for your engagement studio, the “step name” will be pulled into your reporting. Since it’s not always in perfect order, I would suggest, again, ignore step names, and make sure that your asset names are using very clear naming conventions.
For example:
na_aug21_enterprise_drip_1_virtual workshops for Pardot Users
8. Don’t be afraid to pause and then re-start.
Once you start the engagement studio you might realize you need to fix a step or rework another part of the engagement studio. It’s OK to pause your engagement studio program once you have started it. Just know that your prospects will stop exactly where they are in the program. Once it’s turned back on, they will continue down the program.
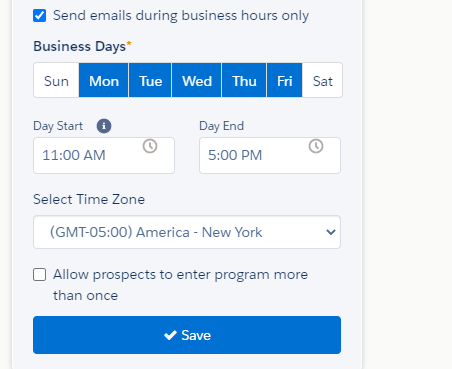
9. Pay attention to the time zones in these two areas.
There are two areas to really pay attention to time zones. The first is your send times, which can be adjusted by clicking the teardrop shaped “start” icon at the top of your program. Here you can decide the time ranges that your emails will send out.
Note, if you need to send a particular email on a specific date you can adjust that on the send email action.
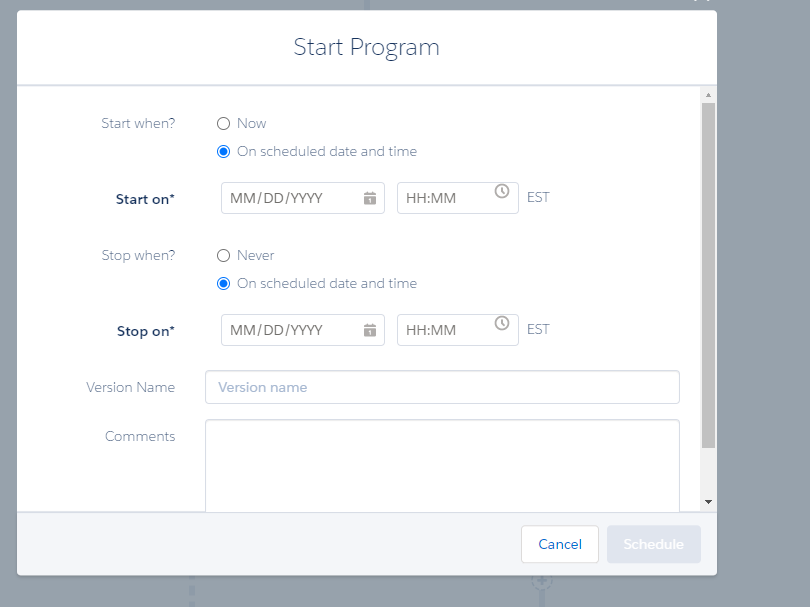
The second place where you’ll want to pay attention to the time zone is when you get ready to schedule or launch your engagement studio. From your engagement studio program, there will be a “start” button in the upper right-hand corner. Once you click that start button, you’ll be asked when you would like to launch your program.
The time zone featured in this screen is based on whatever time zone your specific user instance was setup for. In the example below, my time zone for my user account is set for Eastern time. I can’t adjust this time zone from this screen (it’s done at the account settings level), so just make sure you are paying attention to what time zone is here and converting the time if needed to match with your expected outcome.
Don’t Go It Alone.
Building your first program in Pardot’s engagement studio can be daunting, hopefully these tips will help you be more prepared to build and deploy your engagement studio program. If you need some extra hands, BDO Digital has a team of certified Pardot experts to help you get started.

Bridget has spent the past ten years combining her passion of helping others with her marketing skills and experience. She’s a Pardot Certified Specialist who loves using marketing automation to hit marketing goals. In her spare time, Bridget loves spending time with her family (including her cat, Smash), eating great food, gardening and traveling.
The post 9 Tips to Launching Your First Email Program Using Pardot’s Engagement Studio appeared first on DemandGen.


