

If you run lead nurturing campaigns or complex automations in Pardot’s Engagement Studio, you may have noticed that the standard, out-of-the-box reporting capabilities leave a little to be desired.
Pardot’s built-in reporting within Engagement Studio is sufficient for viewing data quickly and making changes to the studio. If you want a more comprehensive view of how your drip campaigns are performing, however, you’ll need to find a better way.
Fortunately, thanks to Pardot’s native integration with Salesforce, all Pardot asset data — including emails, links, landing pages, and forms — already flows into the CRM as their own objects, which are reportable in Salesforce.
So, if you’re eager to have comprehensive reporting on how your Pardot Engagement Studios are performing, you’ll need to make all of your email data available for report building in Salesforce. It will take a little bit of effort on your part, but the results (literally, your campaign metrics) will be worth it.
Ready to get started? Here’s a step-by-step guide for building a report in Salesforce for your Pardot Engagement Studio programs:
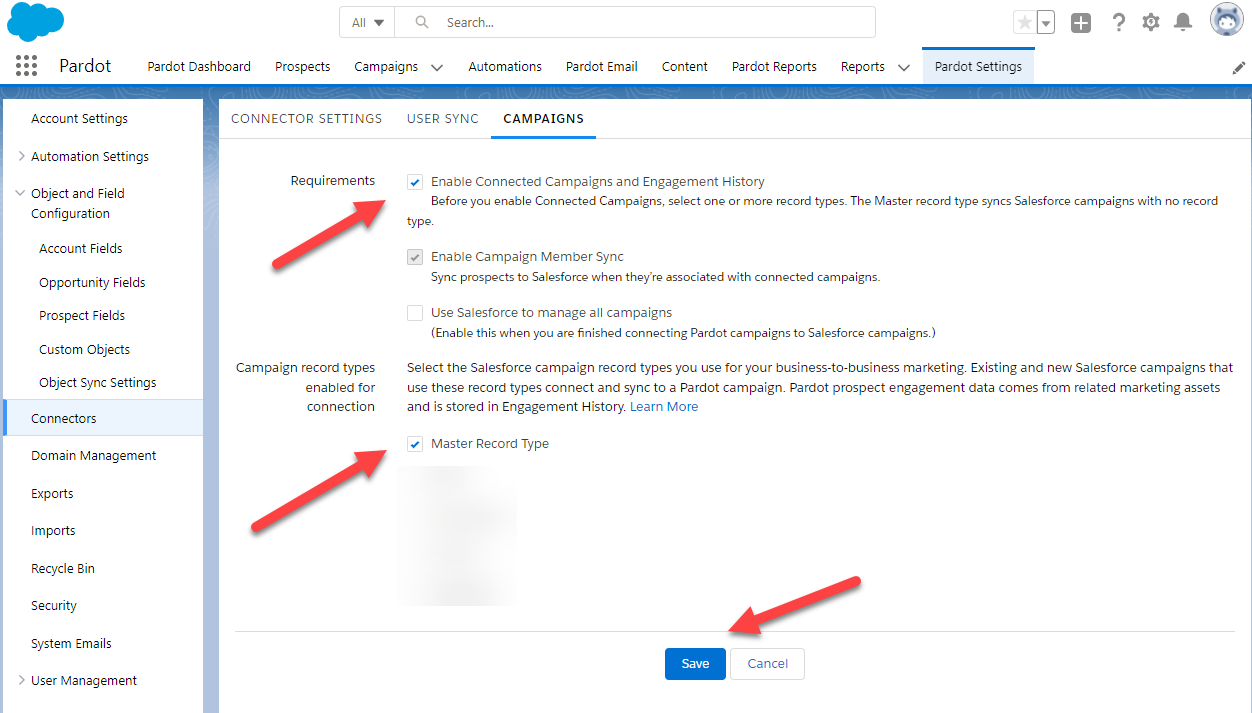
Step 1: Enable Connected Campaigns.
Before you can take advantage of the reporting capabilities in Salesforce, you must first enable Connected Campaigns, if you haven’t done so already.
Step 2: Create a custom Report Type in Salesforce.
The report you need to build is one that involves the Pardot Email object that is created and available with Connected Campaigns.
- From the Salesforce Setup Menu, Search “Report Type” in the Quick Find Box. Then, click “Report Types” from the menu.
- Next, click “New Custom Report Type” from the Report Types Setup Menu. (Note: If you don’t see that button available, you don’t have access to do it and you’ll need to contact your Salesforce Administrator.)
- In the next step, under Report Type Focus, select “List Emails” for the Primary Object. Then, create a name for the report, describe it, and add it to the appropriate report category.
- Depending on how your Salesforce Org is configured, you may need to select “In Development” for Deployment Status.
- Next, you will see that the List Emails object has no further relatable objects. Click “Save” in the bottom right corner.
- If you did not push this to Deployed yet, that is required to access the report type for building.

Step 3: Create the report in Salesforce.
- From the Quick Launch menu on the left, search for “Reports.”
- Once on the Reports page, click “New Report” in the top right-hand corner. (Note: If you don’t see this button, you don’t have access. Contact your Salesforce Administrator.)
- In the modal window that pops up, click “Search Report Types” and enter the name of the custom report you created.
- Click on the report type and in the next window name the report.
Step 4: Apply filters to select your Engagement Studio programs.
To isolate the emails in your Engagement Studio programs, you will need to apply the appropriate filters:
- Show Me: All list emails AND
- Created Date: Enter a created date AND
- Type equals Automated Email AND
- Program Name is not empty
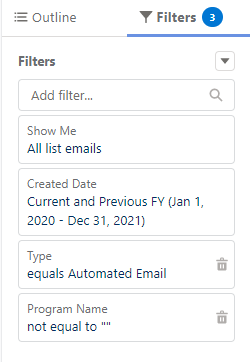
The List Emails object includes emails sent from Engagement Studio. You can distinguish the emails sent from Engagement Studio through the “Automated Email” Type field.
Step 5: Select columns for your report.
Unfortunately, Pardot does not bring over the names of the emails from Engagement Studio; it only shares that it was a Send Email step. In order to identify each email, I recommend including the following columns in any report on Engagement Studio emails:
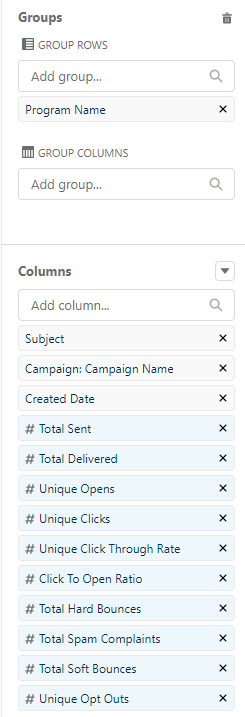
- Program Name
- Campaign: Campaign Name
- Subject
- Created Date
- Scheduled Date
The Subject and Campaign columns will help you quickly identify each email. Other columns to consider adding are:
- # Total Sent
- # Total Delivered
- # Unique Opens
- # Unique Clicks
- # Unique Click Through Rate
- # Total Hard Bounces
- # Total Spam Complaints
- # Total Soft Bounces
- # Unique Opt Outs
I recommend arranging the columns in an order that makes the most sense to you. You can do that by clicking and holding the columns in the left Columns menu and dragging each one where you want it to go.
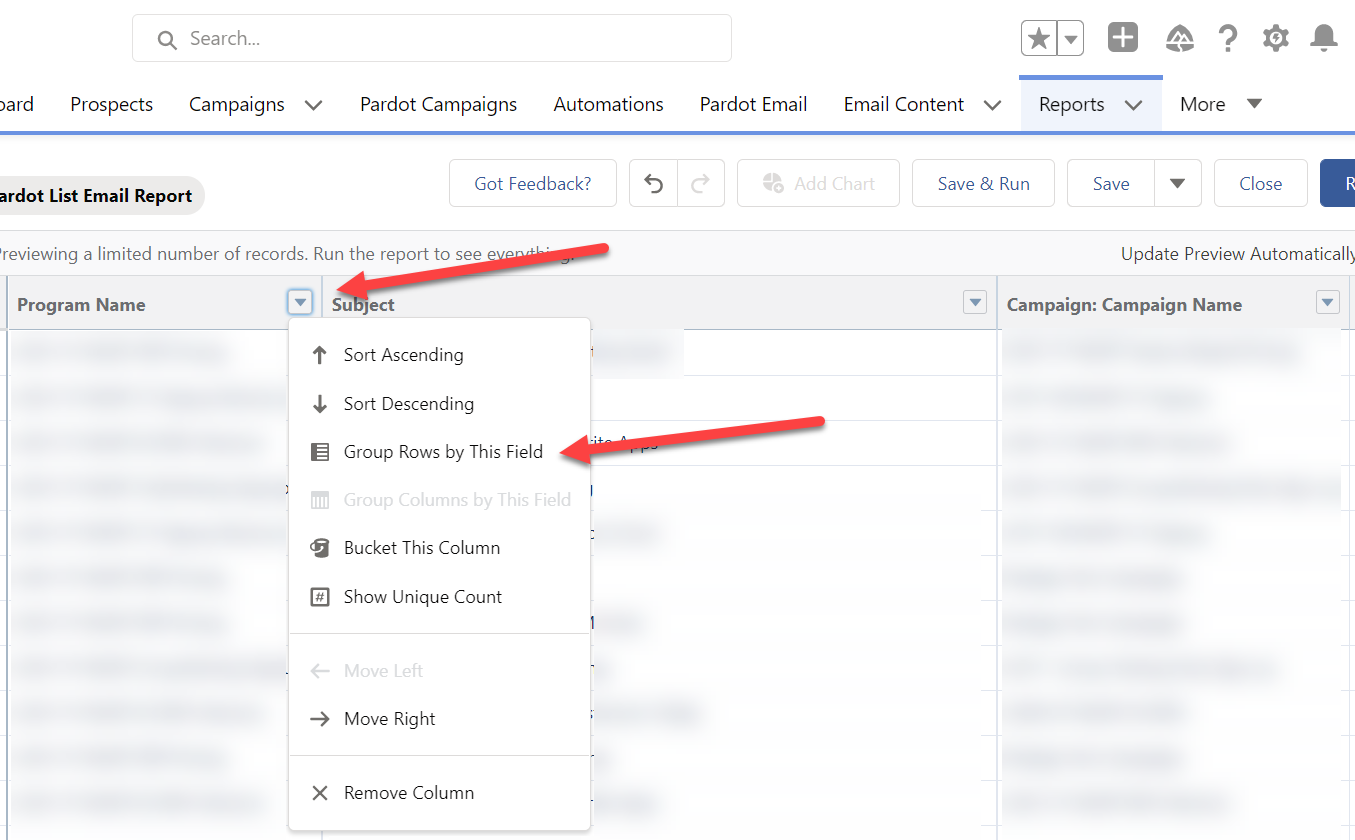
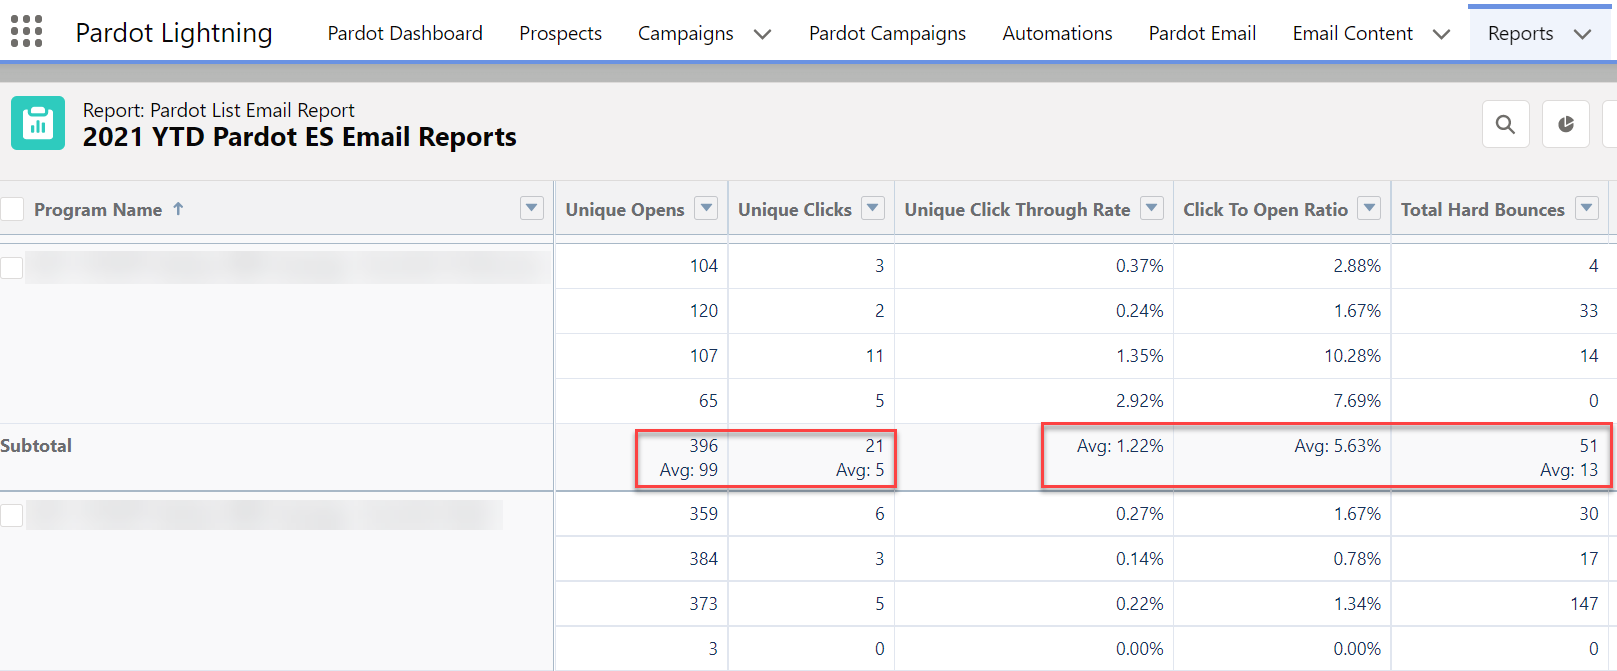
Step 6: Group columns by Program Name.
At this point, your report is a long table of emails with metrics. To make the most sense of it, you’ll need it to be better organized. Your next step is to click the down arrow on the Program Name column and select “Group Columns by this Field.” Refresh the report and you will see that the email data is nowclustered by Program Name (aka the name you gave your Engagement Studio).
Step 7: Calculate column totals.
By default, the Salesforce report will give you sum totals of every column with a number in it. That includes percentages. On some of the columns having a sum is helpful, but you also may want an average, too.
In each column with a number (not a percentage), click the down arrow next to the column name, scroll to “Summarize,” and click “Average” from the list of available options; “Sum” will already be checked. Refresh the table and you will see a new value in the subtotal called “Avg.” The average will also appear at the bottom of the table for all rows.
For columns with numbers that are percentages, click the down arrow next to the column name, scroll to “Summarize,” and uncheck “Sum.” Refresh the table and repeat the previous step, only this time select “Average.” When you refresh the table, you will see the columns with percentages now show you the averages from the percentages in each row in the subtotal.
Step 8: Save and run your report.
Now that the dashboard has been appropriately filtered and grouped, click “Save & Run” in the top right menu. In the final version of the dashboard, you will see totals above the table for the rows that have Sum and Average figures.
If you are happy with the report, make sure to save it in a folder that others can access. You can use it to build dashboards, or you can share it with others who need visibility.
Step 9: Display data as a chart (optional).
Since we have chosen to group the table by Program Name, we are now able to build a chart to represent the data. In the top right corner, click the pie chart icon (a bar chart will appear by default). Click the gear icon on the right, above the chart, and you will see other chart types available. Click the Y-Axis to select a different metric to display in chart format.
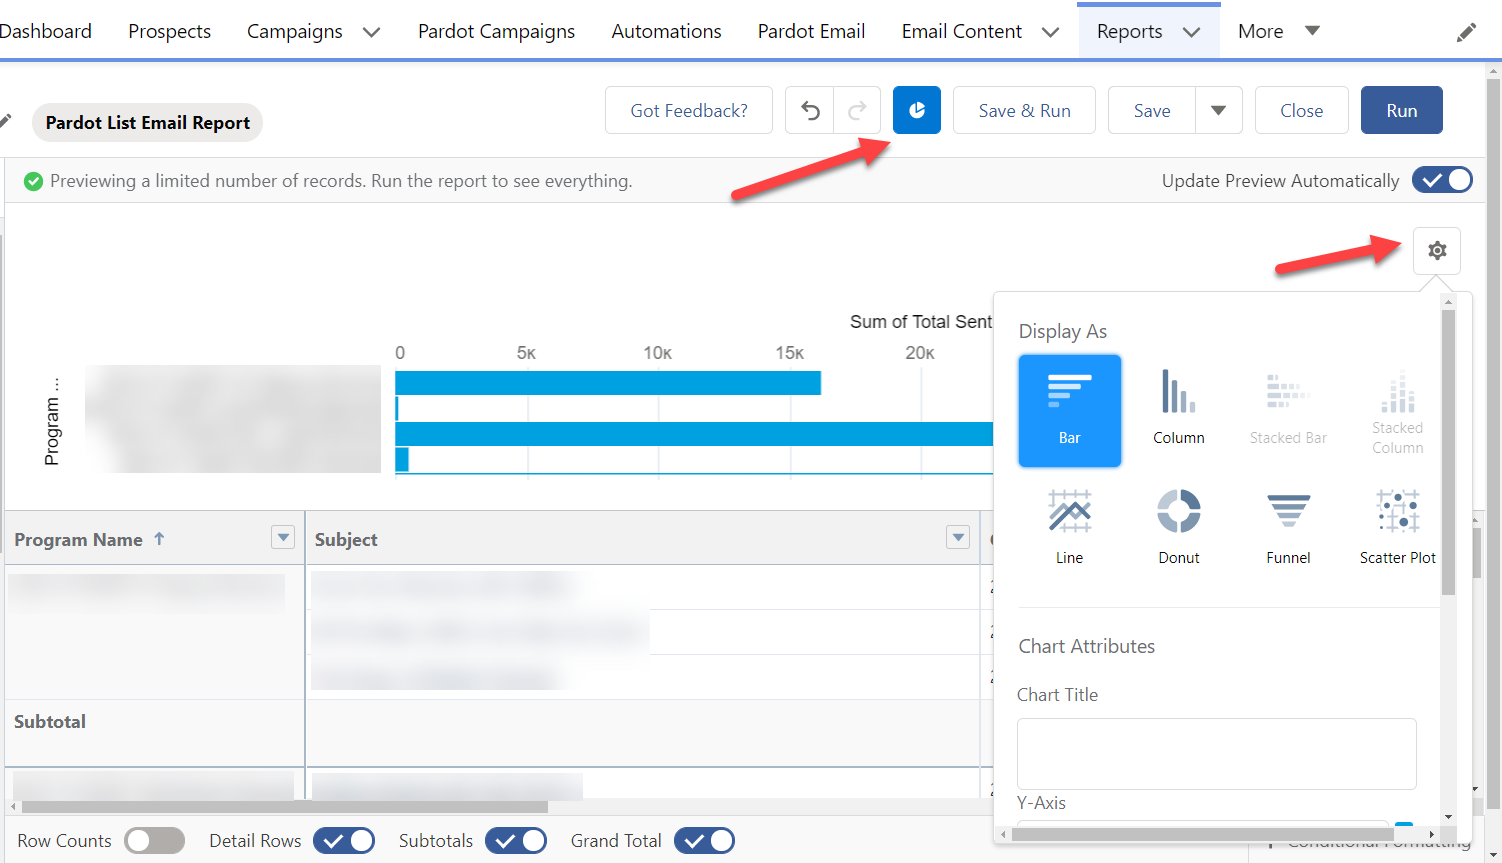
Once you have identified the metric to display and the chart type, click “Save & Run” in the top right corner. On the next page, you will see the selected chart above the table and below the summary data for each column.
We can help you get more out of your MarTech
At BDO Digital, we’re experts in making sure your Pardot and Salesforce instances work together in harmony. Whether you’re just getting started with Pardot or you’re looking to get beyond the basics, our Pardot Consulting Services can help you take full advantage of the platform’s capabilities — including comprehensive reporting and campaign services — to accelerate customer acquisition and expansion.

Ben LaMothe is a Salesforce-certified Pardot Solutions Architect with BDO Digital’s Demand Gen Group. In addition to being a Certified Pardot Consultant, he has more than 10 years of experience specializing in marketing automation, demand generation, marketing operations, and campaign execution. Ben is a two-time Salesforce Marketing Champion and recipient of the Salesforce Golden Hoodie. He leads the Tampa Pardot Community Group and is a regular speaker at Salesforce community group meetings and Trailblazer conferences in the United States and globally.
The post How to Report on Your Pardot Engagement Studios in Salesforce appeared first on DemandGen.


