

I love Marketo Email Editor 2.0. The editor lets you easily drag and drop different sections into the email builder, as well as move sections around and delete or duplicate sections with ease. I wish all marketing automation platforms provided this kind of modular capability for email templates.
It’s sometimes difficult, though, to find documentation for a few of the common challenges I’ve encountered. I spend the majority of my time building out new email and landing page templates in Marketo and Eloqua for our clients, so I’ve gotten to know the quirks and workarounds for some of the most common headaches when creating emails.
Below are the top three challenges I’ve encountered, which I hope will help you streamline new email creation and provide an optimal user experience for your clients and prospects.
Tip #1: Reduce the number of variables in your code
Variables create controls in the editor that allow the user to change/input certain elements within an email, such as background colors, font styling, padding, spacer height, text, link URLs, lists, etc. If an email template includes a variable to change a background color, for example, you can change the background color using a color picker control in the editor.
Any time you change the value of a variable, it will update all instances of the variable ID in the editor or in the code. Sometimes, though, you may want to update a value independently of the other modules in your template.
There are a lot of different ways to use variables that let users control the look and feel of an email. If you wanted variables to function independently from one module to the next, you would have to create duplicate variables with unique IDs for each module.
Say you create a module with variables for all the elements you want the user to be able to control. If you need to create a similar module, you would most likely copy and paste that section of code as well as the set of variables that went along with it, and then change each ID slightly. You can see how this can add up.
How do we keep this from getting out of control?
Instead of creating unique variables for each item, you can simply add mktomodulescope=”true” attribute to the <meta>, which will turn the variable into a local variable:
![]()
As a result, you can use the same variable ID in multiple modules, but you can modify the values independently — even when you reuse the same module multiple times in an email. This reduces the number of meta tags needed in the code, so you don’t have to continually update them.
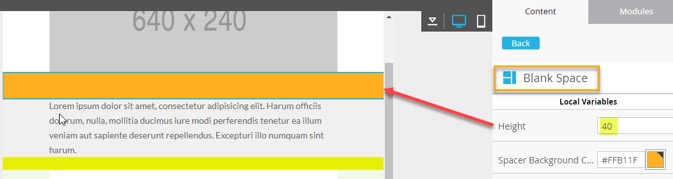
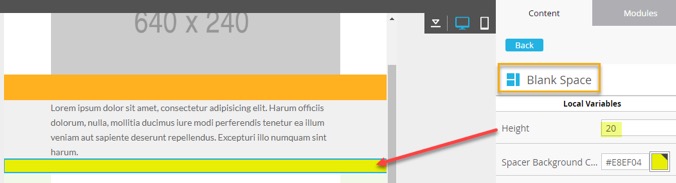
In the example below, the “Blank Space” module is used twice. Since the variable that controls height includes the attribute mktomodulescope=”true”, it becomes a local variable and the values can be set independently from each other. The same goes for the spacer background color in this module.
Tip #2: Don’t use mktoNumber for height or width values
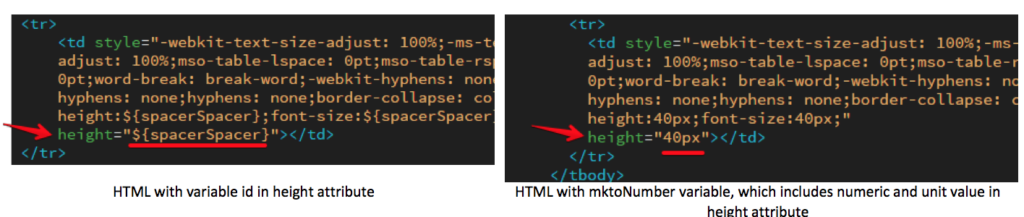
Some email clients don’t recognize unit values set in height and width attributes (e.g., height=“40px” where height equals 40 and the unit value is in pixels).
![]()
When specifying a variable as a number, the value inserted in the variable will include the numeric and unit values together, whether you want it to or not.
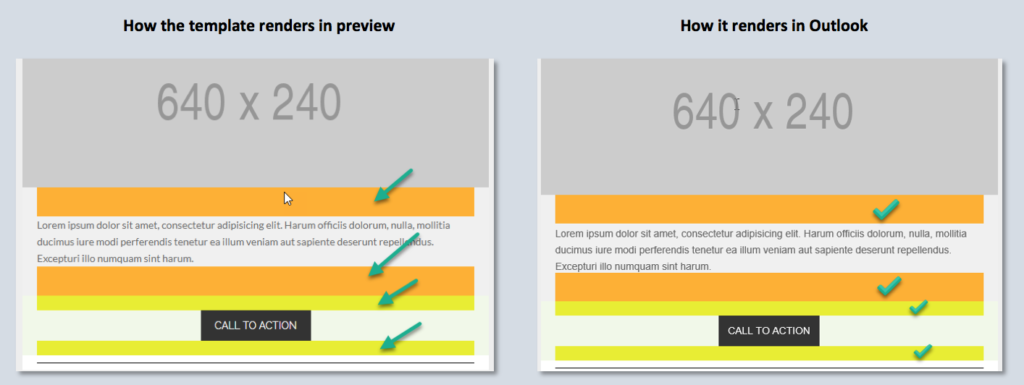
In the template example below, I’ve added background colors to the spacers to highlight how much white space should appear. The screenshot on the left is from the template preview, and the screenshot on the right is the same template sent as a test.
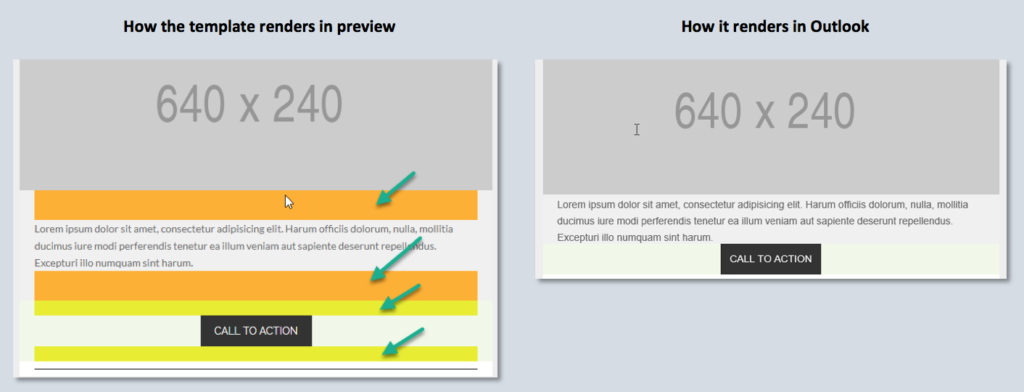
You can see that as a result of using the mktoNumber variable (at least in the way that the default Marketo template uses it), the spacer height is entirely ignored, causing the email to not render correctly.
Instead, use mktostring with a simple numeric default value. This way the unit designation is not inserted with the numeric value:
![]()
It’s also a good idea to include the styling for the value as inline CSS to ensure that the layout renders correctly. Just make sure to add the unit designation after the variable id in the inline CSS since it is not automatically inserted using this method ( height:${spacerSpacer}px; ).

After making the changes to the HTML, you can see in the screenshots below that Outlook does not ignore the height value and the email renders correctly:
Tip #3. Hide modules by default
Sometimes, Marketo admins will create a single master email template with every type of module with section or layout style they could ever possibly need. That way, users have some flexibility when building new emails without having to request the creation of additional modules or templates.
Unless specified, every module will appear in a new email created from the template, which could be a little intimidating for your users. I’m sure they can do without seeing every module for every layout option, alternate footers, 2-column section, 3-column section, etc. It can get a bit crowded. And to make things worse, if they don’t want to use them all, they’ll have to remove each one individually.
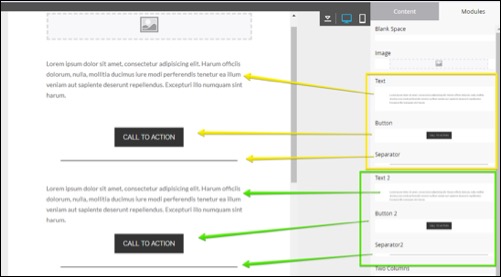
Even if you don’t need the Text 2 module (in green) for an email, it will still display in the email editor.
A cleaner and more efficient way would be to setup the template so that only a set of modules are visible by default each time you create a new email.
To do this, simply add the syntax mktoaddbydefault=”False” to the container element of the module:

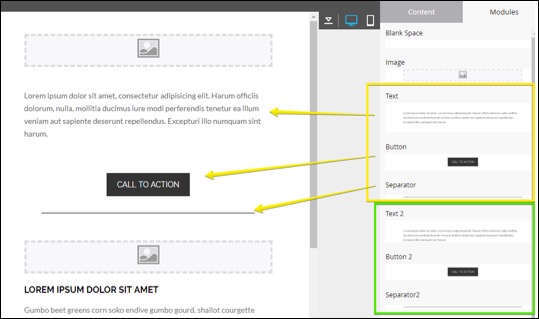
Only the modules you haven’t added this syntax to will appear in the editor workspace, yet you’ll still have access to the modules not displayed in the container element should you need them.
By including the mktoaddbydefault=”False” string to the Text 2 module, it won’t
display in the email editor but will still be available in the container element.
Ready, set, email
I hope these tips make email building a little easier for you. And if you need a helping hand, our marketing automation experts are at the ready to help with the heavy lifting.
What’s something you’ve encountered that you’ve developed a workaround for? Your fellow email creators want to know!
 Adam Mokrzecki is a DemandGen Implementation Architect who supports the marketing efforts for multiple client accounts. A Jack-of-all-trades, Adam is Eloqua Partner Certified and a Marketo expert with extensive experience in campaign strategy and execution, lead management, reporting and analytics, email and landing page development. Adam has a keen sense for problem solving, quickly finding and implementing solutions to any challenges keeping clients from reaching their marketing goals.
The post 3 Tips for Streamlining Your Marketo 2.0 Email Templates appeared first on DemandGen.
About the Author
More Content by DemandGen


![Lead Scoring: How to Structure Programs in Marketo [Part 3 of 3]](https://content.cdntwrk.com/mediaproxy?url=https%3A%2F%2Fi.ytimg.com%2Fvi%2FEMerUYoHXLk%2Fhqdefault.jpg&size=1&version=1665679078&sig=fd186027844666e47f7df334bbff40de&default=hubs%2Ftilebg-videos.jpg)


